8rdavcore 0.8.8
http://www.hasw.net/8rdavcore
Hello, this is a short manual for all who using 8rdavcore the first time.
It explains the most important things (I hope),
but this manual is work in progress.
First start
On the first start of 8rdavcore (or when the config.ini was deleted), 8rdavcore tries to detect your mainboard.
If this works, you will see the main page. But it's a good idea to check the settings page if the correct board
and driver is selected.
Picture1:
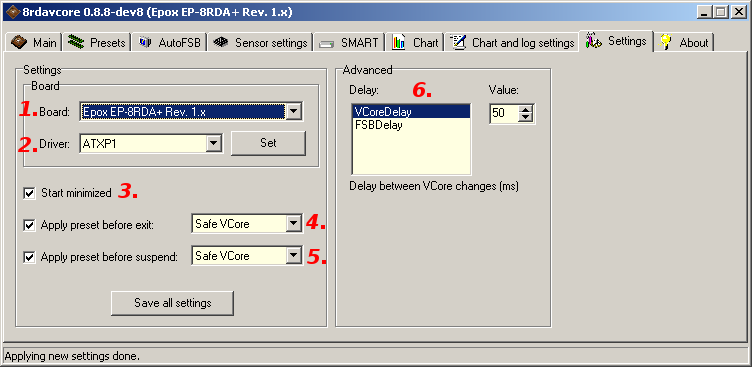
(1.) Mainboard:
First set your Mainboard with 1., if not already done. When your board is not listed, use the "General" board.
If you changed the board, use Set to apply the change. 8rdavcore is now reloaded with the settings for your board.
(2.) Driver:
An important point is the selected driver. Currently there are two available, "ATXP1", which allows direct hardware access to the
voltage controller, and "SMI_DRIVER", which uses the SMI BIOS interface from nVidia(R) for their system utility.
Which driver is available depends on your board and bios. If the "ATXP1" is available you should first test it. Some voltage are
only available with one driver, so maybe you have to test which is the best one for your needs. If you have changed the driver, you have
to use Set to apply the changes and probably restart 8rdavcore.
(3.) Start minimized:
Does what it sounds like.
(4.)/(5.) Preset setting on exit/standby:
If you want to apply settings on exit of 8rdavcore (shutdown) or if you use standby you can select here which presets to apply on this
events. It is important to set a safe VCore on standby/shutdown because the most BIOSes doesn't reset the voltages, but the FSB is. So if you
underclock your CPU, it will not start after standby if you don't reset the VCore to the default value.
(6.) Advanced:
Here you can set some advanced settings like the delay between the FSB or VCore changes.
Main
On this page you can set the voltages, chipset settings and the FSB. Also the sensor values are displayed here.
Picture2:

(1.) CPU voltage:
Should be self explaining. The blue bar shows the range greater than 1.85V because switching from smaller values than 1.85V to higher
ones is on some boards unstable.
(2.) Other controls:
Here can you set the other voltages, chipset settings and other things like FAN speeds (PwmX), if supported by your board.
The Start-Value shows the value at start time of 8rdavcore.
(3.) FSB:
Also self-explaining. You should not set higher values than BootFSB + 10 MHz. Also on the most boards there is a low FSB limit.
Mostly it's near 133, 110 or 100.
For testing you can use the prime95 "Torture test". Run it and change the FSB in 5 MHz steps, if prime95 reportes an error add 5-10 MHz.
This test method works for me also when I try to find a new low limit of the CPU voltage, but then you need longer test periods.
(4.) Sensor:
The sensor values are displayed here.
(5.) Add preset/Show current/Apply/Exit:
Add preset adds the current settings as a new preset to the preset list. For the preset values, the current selected values are used,
not the current values from the hardware. So you not have to apply every setting to the hardware first if you want to create a new preset.
Show current resets the sliders etc. to the values current used by the hardware, if you have changed them but not used Apply to
apply them.
Exit: Hmm.
Sensor settings
On this page you can select which sensors are displayed on the main page, change the sensor names and set the update intervall.
Picture3:
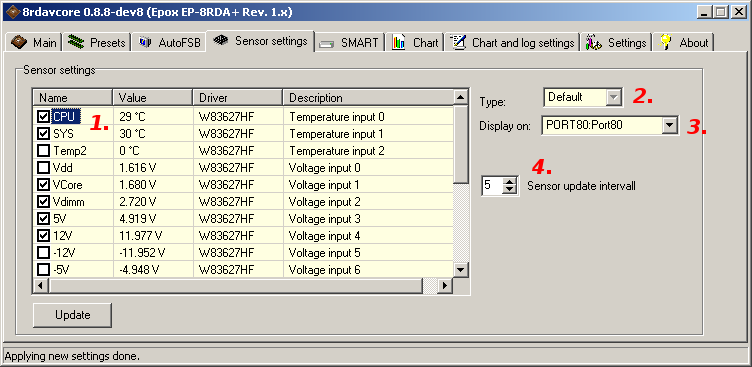
(1.) Selection/Renaming:
If the checkbox is selected, this sensor is displayed on the main page. Use the Update button if you have done your changes.
You can also rename the default names if you select the sensor and click once on it. Also if the value for the voltage doesn't fit, you can
use 2. to change the voltage type.
(3.) Display:
If you have a Port80 diagnostic LED display, you can one value display here.
(4.) Update intervall:
This sets how often the sensor values are updated (in seconds).
Presets
Here you can managed your presets (collection of settings/values).
Picture4:
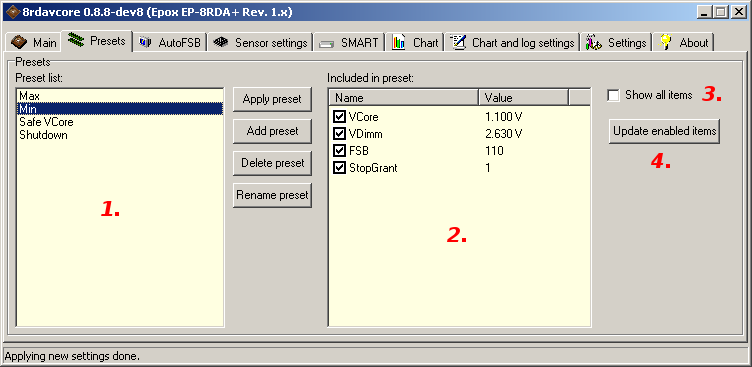
(1.) Preset list:
Here you see your current available presets. You can apply them (double-click, button or over the traybar menu), rename or
delete them. All functions also available as right-mouse menu.
(2.) Preset items:
This list shows the included items in the selected preset. Only checked items are applied, if you want to see all items you can use
3.. If you made changes to the items, use the update button (4.).
AutoFSB
Here can you managed AutoFSB, an utility to automatically apply presets if an event occur (CPU load, sensor values).
Picture5:
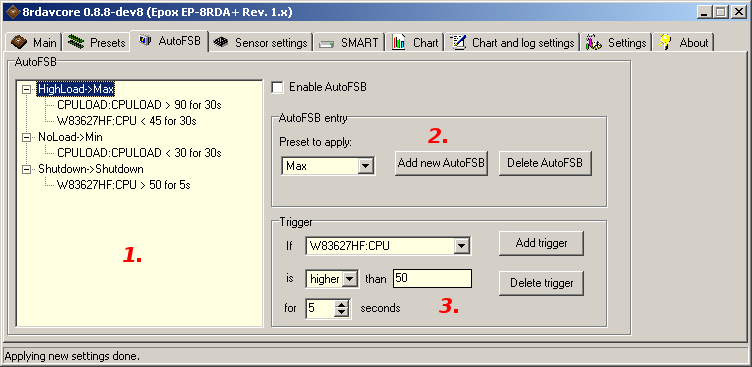
How AutoFSB works:
AutoFSB sets a specified preset if one (or more) trigger(s) are true. A trigger consists of a monitored value, which can be currently any
sensor values and the CPU load.
It's possible to add multiple triggers to a AutoFSB entry. If all triggers of a parent AutoFSB entry are true, the preset defined in the
AutoFSB entry gets applied.
Also multiple AutoFSB entries can be true. If this occurs all defined presets get applied after each other. It is important to know this if
you want, e.g. use three speed ranges depending on the load. So do not only define three AutoFSB entries including one preset: For example
<10, >30 and >60. If the value is greater 60, both AutoFSB entries are true, 30 and 60, leading to a not wanted behaviour applying both presets
the one defined for >30 and the one defined for >60. To avoid this you have to define ranges, by adding a second trigger. So the second AutoFSB
entry must contain two triggers, one with >30 and one with <60.
(2.) Adding a AutoFSB entry:
If you want to add a new AutoFSB entry, select a preset which gets applied if the entry is true and use "Add new AutoFSB".
(3.) Adding triggers to an entry:
Now you have to add one or more trigger(s) to the new created AutoFSB entry. Select the AutoFSB entry where you want to add the trigger.
Define what value you want to monitor (e.g. CPULOAD), the limit, when the trigger is true (higher/lower) and how low the limit must be
reached until the trigger is true.
Example:
I show you some examples you see at 1.. "HighLoad->Max" (where HighLoad is the AutoFSB name and Max the preset which gets applied) is
true when the CPU load is higher than 90 for at last 30 seconds and the CPU temperature is lower than 45.
The second, NoLoad->Min, is true when the CPU load is lower than 30 for 30 seconds.
Shutdown gets applied when the CPU temperature is higher than 50 for 5 seconds. Note that NoLoad->Min and Shutdown->Shutdown can both be true.
In this case both presets get applied.
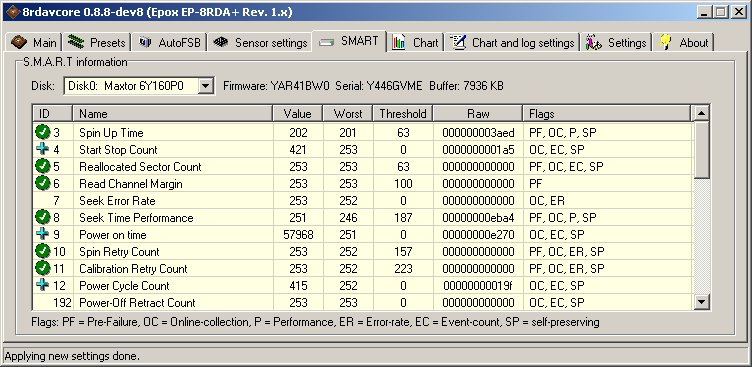
SMART
This page shows you the S.M.A.R.T (Self-Monitoring, Analysis and Reporting Technology) info of your harddisc(s). In specific it should display
pre-failure and health information of the disc. There are many more and detailed information about this topic available in the internet.
For a short summary, green icons are good, red are bad ;) The + icon shows that the displayed value is a countable value, e.g. the total power
on time in minutes or how often the harddisc was started.
Picture6:
Chart
Here you can see the current selected chart series. They can be configured on the Chart and log settings tab. Hold the right
mouse button to move the chart area or use the mouse wheel to move area up/down.
Picture7:
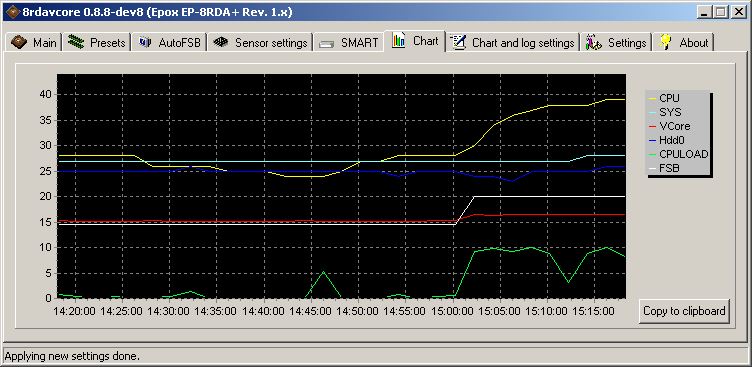
Chart and log settings
This tab configures the chart and logging options.
Picture8:
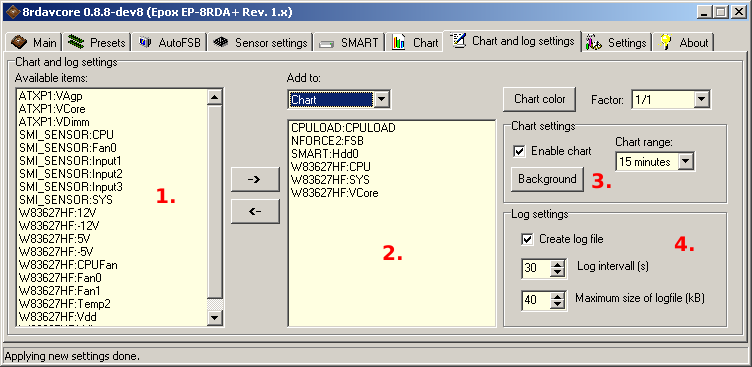
(1.) Adding items to log/chart:
You can add logable items 1. to the log/chart list 2. if you double-click on the specific item or use the -> Button.
Removing works the same way, but you have to double-click the item in list 2..
If you have selected a chart item, you can also choose the chart color and chart factor.
(3.) Chart settings:
Chart range sets the display chart area (y-range). Enable and background color should also be clear.
(4.) Log settings:
This settings are for the created log file (log.csv). The delimiter used for this file is ;.
End
I hope this short overview has helped you a little bit. It's not finished and if you want to improve it or write a new one, you're welcome.
Sebastian, 2004